Youtube, Does it take forever to start streaming? It might be your pfsense firewall!
https://www.azcs.ca/wp-content/uploads/2025/09/pfsense-ip-offloading-pic-1024x481.jpeg 1024 481 rdwild rdwild https://secure.gravatar.com/avatar/6ac25e7c492d479e3d4439dc4153cc63fda02a2a5ddf1385f35a7f78c04be1d1?s=96&d=mm&r=g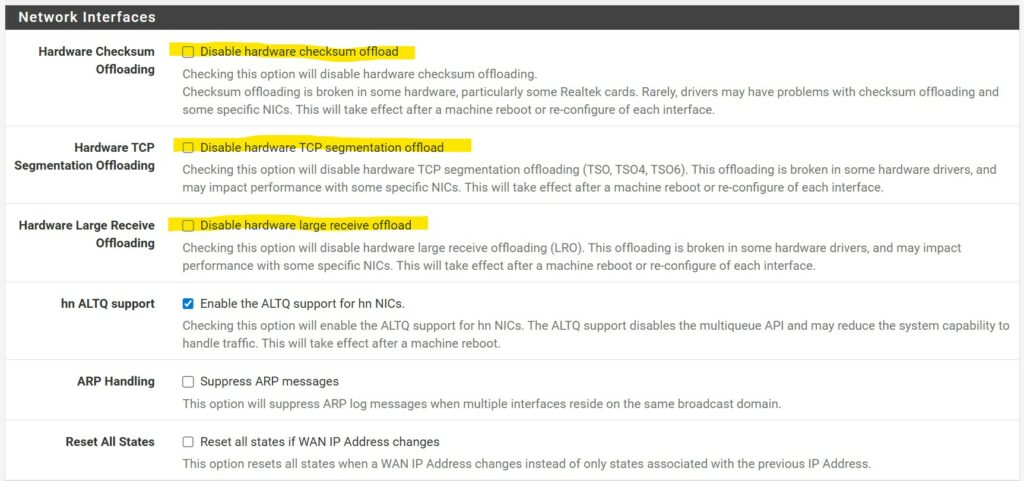
Is Your pfSense Configuration Buffering Your YouTube Experience? Let’s Talk IP Offloading
Have you ever found yourself staring at a spinning wheel on YouTube, waiting for a video to start, despite a perfectly good internet connection? Or perhaps your videos are constantly buffering, turning your streaming session into a stop-and-go nightmare? If you’re running pfSense as your firewall and router, a seemingly innocuous setting called IP Offloading might be the culprit.
Many pfSense users, in an effort to ensure maximum compatibility or troubleshoot other network oddities, often follow advice to disable IP offloading settings. While this can be a valid approach in certain scenarios, particularly with specific hardware, it’s not always the optimal solution – and it can have a direct, negative impact on your streaming experience, especially with platforms like YouTube.
The IP Offloading Dilemma: Enabled (Not Offloaded) vs. Disabled (Offloaded)
Let’s clarify what “IP Offloading” means in this context. When IP offloading is enabled (which is typically the default), your network card’s hardware takes on some of the processing burden for tasks like checksum calculations. This frees up your main CPU, allowing pfSense to handle other critical routing and firewall tasks more efficiently.
Conversely, when IP offloading is disabled, these tasks are pushed back to the main CPU. While this might sound safer or more robust, it can bog down your system, especially if you have a less powerful CPU or are dealing with high traffic volumes.
The YouTube Connection: Why Disabling Offloading Hurts
YouTube and other streaming services rely heavily on efficient, low-latency data transfer. When IP offloading is disabled, and your CPU is burdened with tasks that your network card could otherwise handle, it can lead to:
- Increased Latency: The additional CPU cycles required for offloaded tasks can introduce delays in packet processing. This extra latency is precisely what causes videos to take longer to start.
- Reduced Throughput: A bogged-down CPU might not be able to process network traffic as quickly, leading to a bottleneck that manifests as constant buffering and poor streaming quality. Your internet speed might be phenomenal, but if your firewall can’t keep up with processing the packets efficiently, it won’t matter.
- Session Establishment Issues: The initial handshakes and session establishment with YouTube’s servers can be particularly sensitive to these processing delays, making that first video load excruciatingly slow.
The Realtek Exception (and Why It’s Often Misinterpreted)
It’s true that for a long time, certain Realtek network interface cards (NICs) have had documented issues with IP offloading. In these specific cases, disabling offloading has often been the recommended workaround to achieve stable network performance.
However, this advice has often been generalized, leading many users with non-Realtek hardware to disable offloading unnecessarily. If you’re running a pfSense box with Intel, Broadcom, Chelsio, or other reputable enterprise-grade NICs, the likelihood of encountering offloading issues is significantly lower.
Recommendation: When to Enable (and When to Disable)
Here’s the takeaway for optimizing your pfSense setup for smooth YouTube and streaming performance:
- If you DO NOT have Realtek NICs: It is generally recommended to keep IP Offloading settings ENABLED in pfSense. This allows your network hardware to do its job efficiently, freeing up your CPU and improving overall network throughput and latency, which is crucial for streaming.
- If you DO have Realtek NICs: If you are experiencing stability issues or random network drops, then disabling IP offloading might be a necessary troubleshooting step. However, be aware that this could come at the cost of streaming performance. If you have Realtek hardware and encounter streaming issues, consider upgrading your NICs to a more robust brand like Intel if possible.
How to Check and Adjust Your Settings
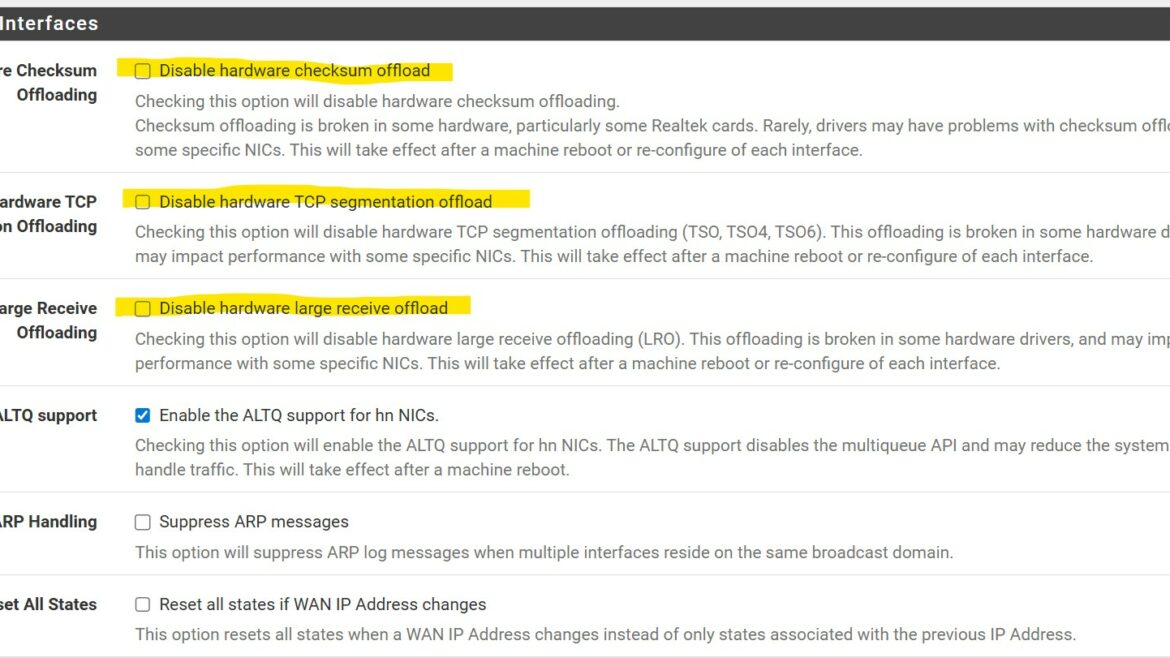
You can find the IP Offloading settings in pfSense under System > Advanced > Networking. Look for options related to “Hardware Checksum Offloading,” “Hardware TCP Segmentation Offloading,” and “Hardware Large Receive Offloading.”
Experiment with these settings, always making one change at a time and testing the results. A good test involves watching several YouTube videos to see if the start times improve and if buffering is reduced.
Don’t let an outdated or misapplied configuration setting cripple your streaming experience. By understanding the role of IP offloading and applying the right settings for your hardware, you can get back to enjoying your favorite content without the frustrating waits and interruptions.